10/30/09
SimData
I wrote this program for
myself, but some others have found it useful.
EZNEC will do a frequency
sweep, but its results go into a large, cumbersome file. SimData will extract the most useful data
from that file and place it into a new compact file that can be loaded easily
into Excel, Mathcad, or other analysis program.
Optionally, SimData will
draw graphs of gain versus frequency for one or more antennas, graphs suitable
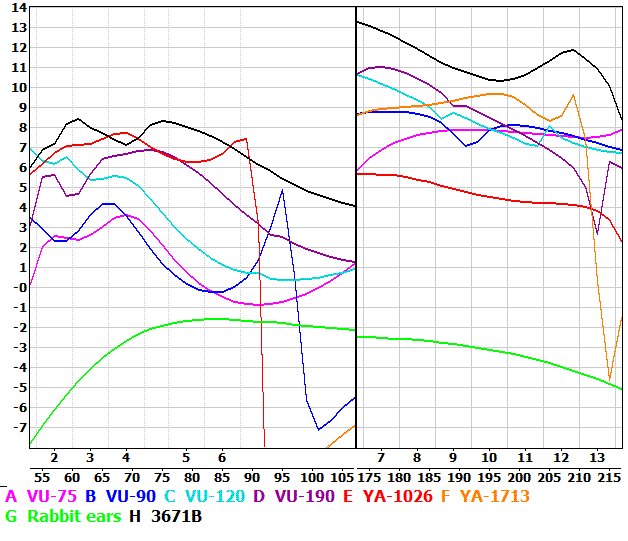
for publication. SimData created this
graph:
SimData is a Windows
program that will run on Windows 2000 and newer, including Vista. SimData is compatible with EZNEC 4, and
probably other versions of EZNEC, but I am not sure which.
Running SimData the first
time is not trivial. It will take you
some time to set things up properly. But
if you run SimData many times it can dramatically reduce your workload. SimData is optimized for mistake-free
repetitive usage.
Installation
There is no formal
installation procedure. You just
download it and run it. It is not a “registered” program and does not
show up in the list of installed programs.
The second file below is a
“graph control” file. Such a file tells
SimData how to draw a graph. You can
create this file from scratch, but it is easier to make a copy of the file
below, and then modify it to do what you want.
Create a folder where you
want SimData to reside. We shall call
this the “execution folder”. It can be
anywhere and have any name, but it should not be read-only. Download both of these files into that
folder. You may want to create a desktop
icon for starting the program.
Download SimData.exe now. (468 KB)
Download graph DB8 gain.txt
now. (3 KB)
If you try this program,
send me a note at kq6qv@aol.com and tell me
how it worked out.
Running SimData
SimData assumes the
execution folder has a sub-folder for each antenna type. I keep the .ez file there. SimData will create two identical copies of
its output file. One is placed in the
sub-folder and is named “xxxDATA.TXT”, where xxx is one of these: VLF, LF, MF,
HF, VHF, UHF, SHF, or EHF. We shall call
that file the “band data” file. The
second copy is called SIMDATA.TXT and is placed in the execution folder. (I found this second file more
useful for Excel, but you might have no use for it.)
SimData extracts the raw gain for the straight ahead direction only (The EZNEC X-axis direction). Each line
of the band data file is for one frequency, and contains the vertical gain,
horizontal gain, SWR, terminal impedance, and frequency.
SimData assumes the execution folder has a file called SweepData.txt
which was put there by EZNEC.
The EZNEC main window has a space at the top for the name of the antenna.
This name is copied into the sweep
file. SimData takes the first word of
this title and uses it as the antenna folder name. So you must make the first word of the title
match the antenna folder name.

SimData checks the validity of data, but it is not completely thorough in
this. If SimData blows up, you fed it
bad data. SimData is a little dumb.
To
create the Band Data file:
- Start EZNEC.
Make sure the first word of the title is the antenna folder
name. If the title is “CM4228:
Channel Master 8-Bay” then CM4228 will be the antenna folder name. (If the name
ends in a colon, the colon will be deleted. Otherwise an invalid file name would be
attempted.)
- Click Setups > Frequency Sweep.
- Turn on Frequency Sweep. (I usually read the
frequencies from a file, but this is not necessary.)
- Check the box “Data file”. Beside it, enter the file name
“xxx\SweepData.txt”, where xxx is the execution folder.
- There is a group of 5 check boxes labeled Data
File Contents. Check the top 2 box
only (Field Strength Table and Source Data).
- Click OK and run a simulation. The SweepData.txt file will be created.
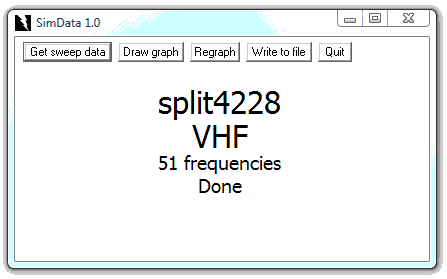
- Execute the SimData program.
- Click the “Get sweep data” button. The window will show the antenna name it
found, the band name, a frequency count, and a termination message. If the termination message is anything
other than “Done” then something went wrong.
To draw
a graph:
Create the graph control file. Do
this by copying an existing graph control file.
Putting the new file in the execution folder is recommended. The new file must have the name “graph
YYY.txt” where YYY is anything (something uniquely describing the graph). YYY can have upper and lower case and can
have spaces, but “graph “ should be lower case.
You can use Notepad to customize this file. The file contains an explanation of what it
does. You will want to change the “Main
graph parameters” in the top part of the file.
The Color Table is in the center of the file. You may add additional colors.
The bottom of the file specifies which antennas are to be plotted and how
they are to appear.
When the graph control file is ready, execute SimData and click “Draw
graph”. It will prompt you for the file
name.
The “Regraph” button does the same but reuses the previously specified
control file. Neither SimData nor
Notepad holds the file open, so both can be running at the same time.
The “Write to file” button saves the graph in SimData.bmp, in the
execution folder. You can use Paint to
convert it into a GIF file.
(The graph data is taken from the band data
files. The program ignores data for
frequencies outside the limits of the graph.
The files do not have to match each other in terms of what frequencies
are present. All plots are drawn as
continuous, breaking only at the graph edges.
The program is not properly though out for when a file or graph crosses
a band boundary. So what the program will
do when the data spans 3MHz or 30MHz or 300MHz is not known. The first frequency the program sees
determines which band it thinks it is in.)
Getting all this working will be a challenge. But after the first time it becomes easy.
This
page is part of “An HDTV Primer”, which starts at www.hdtvprimer.com